Saturday, February 25, 2012

Birthday Breakfast of Blueberry Ricotta Pancakes

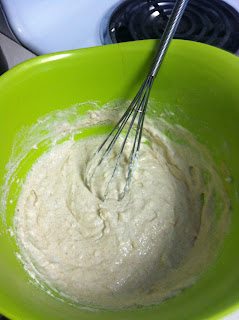
Good morning, as you can probably tell by the title, today is my birthday.  How better to start an awesome day then with delicious blueberry ricotta pancakes. These pancakes are not your typical pancakes that you are used to eating in the morning.  The batter is much more thick than what you are usually used to, they rise a little and are very fluffy. 
Growing up I used to help my mom make pancakes and she always told me the way you know when pancakes are ready to flip is when they get bubbly, these pancakes are different.  I did not see any bubbles when cooking these , they were so thick that they didn't have a chance to bubble.
These pancakes are so tasty and have a little zip that I am not used to because they have lemon juice and nutmeg in them.


Ingredients:
1/2 Cup Whole-Wheat Pastry Flour
1/4 Cup  plus 2 TBSP. All Purpose Flour
1 tsp. Sugar
1 tsp. Baking Powder
1/4 tsp. Baking Soda
1/2 tsp. Freshly Grated Nutmeg
3/4 Cup Ricotta Cheese
1 Large Egg
1 Large Egg White
1/2 Cup Non-Fat Buttermilk
1 tsp. Fresh Lemon Zest
1 TBSP. Lemon Juice
2 tsp. Canola Oil
3/4 Cup Fresh or Frozen (not thawed) Blueberries

Directions:

Whisk the pastry flour, AP flour, sugar, baking powder, baking soda and nutmeg in a small bowl.  Whisk cheese, egg, egg white, buttermilk, lemon zest and juice in a large bowl until smooth.  Stir in the dry ingredients until just combined.

Put a little canola oil in a skillet over medium heat until hot.  Drop about 1/4 Cup of batter onto skillet, sprinkle blueberries on each pancake and cook until edges are dry and bubbles begin to form.  Flip the pancake and cook until golden brown.


Tips:  So I did not have fresh nutmeg, but I did have ground nutmeg so I used about 1/4 tsp instead of the 1/2 tsp. fresh grated nutmeg that was called for.  I also had a tough time finding pastry flour, so I did some research and found an idea to mix half cake flour and half whole wheat flour to make the consistency of pastry flour, so that is what I did.   I was nervous because then I have a whole lot of whole wheat flour and cake flour sitting around my kitchen.  Luckily the hubby and I both loved these pancakes so I will make them more often .  Also final tip, I added a little more ricotta cheese in the pancakes when I added the blueberries, this takes a little sweetness out of pancakes.

Serve with Maple syrup and ENJOY!

Tuesday, February 21, 2012

Baked Tilapia

Now I will warn everyone that I am not a fan of fish.....I love  crab, shrimp and scallops but fish, no thank you.   Since moving to the midwest I have been trying to expand my horizon and have had countless people try to tell me that fresh water fish has a different taste thnt fish from the sea.  This past summer I finally caved after catching my own fish and having a fish fry, and honestly its true, fresh water fish is really an easy fish to start with.  So this past week I decided to be brave, and to be honest also to get some stuff out of my freezer.  The hubby had previously bought some frozen tilapia fillets and so I thought I would search out a way to use them that sounded appetizing to me.
So of course I go to me favorite site...Pinterest. I found one that looked good just called baked fish, so I looked at the recipe, not only is it a quick one but its simple and light, and lately I have been making some heavy foods.  According to the recipe that I found it calls for Haddock fillets, but hey use what you got, I of course asked the hubby if tilapia would work, flavor wise, because I had no idea how it tastes.

Ingredients:

2 large (about 12 oz each) haddock fillets (or any fish you like)
1 tablespoon olive oil, plus a little more to grease the baking sheet
1 small onion, finely diced
1 large clove garlic, minced
6 tablespoons Panko breadcrumbs
1 1/2 teaspoons fresh minced (or 1/2 teaspoon dried) thyme
3 tablespoons fresh minced parsley, divided
Salt and pepper


2 teaspoons fresh lemon juice
Fresh lemon, for serving

Directions:
1.  Preheat the oven to 400 degrees.
2. Line a baking/cookie sheet with parchment paper and brush with olive oil.
3.  In a small skillet; heat olive oil over low heat, add the onion and garlic, and cook until just tender (about 6 minutes)
4.  Add Panko breadcrumbs and cook until lightly golden brown, stirring frequently.
5.  Turn off heat and add 2 tablespoons (TBSP) parsley and a pinch of salt and pepper.
6.  Pat the fish dry with a paper towel, and lay it down on baking sheet.  Drizzle about 1 teaspoon (tsp) of lemon juice on each fillet.  
7.  Top each fillet with breadcrumb mixture and cook about 10-15 minutes

Top with the  remaining parsley and serve with a lemon slice.


TIP: make sure to mince the onion and garlic very well, almost to a paste, you want small enough pieces of each so that it will not over power the flavor and you wont get huge chunks in a single bite.

This is a quick easy and tasty meal that I would actually eat again...which is saying something.  I served the fish with some corn and that paired quite nicely.

ENJOY!

Monday, February 20, 2012

Mother's Famous Chinese Egg Rolls

Egg Rolls, yes they are a lot of work, and yes they are totally worth it.  I was again perusing Pinterest for dinner ideas when I cam across the recipe that I am about to show you, I immediately emailed the Hubby to see if he was interested because we do love Chinese food, and he told me that sounded great.  As I have said before finding certain ingredients up in this area is not always the easiest task, but we did find/already have everything on the ingredients list.  Just and FYI in our grocery store the egg roll wrappers are not frozen, and we found them in the produce section....go figure.  The recipe does say that they have to be frozen wrappers but I work with what I can get.


Ingredients:

50 Spring/Egg Roll Wrappers (about 2 packages), defrosted unopened at room temperature for 45 minutes or in the refrigerator overnight1 tablespoon cornstarch (or flour) mixed with ¼ cup of cool waterOil, for frying
FOR THE GROUND PORK1 pound ground pork1 tablespoon soy sauce1 teaspoon cornstarch1/4 teaspoon sugarfreshly ground black pepper
FOR THE VEGETABLES2 to 3 cloves garlic, very finely minced½ head of cabbage (about 11 ounces)3 carrots, shredded1 teaspoon grated fresh ginger10 fresh shiitake mushrooms (or dried black mushrooms soaked overnight), stems discarded1 tablespoon cooking oil (canola, vegetable, peanut)1 tablespoon Chinese rice wine1 tablespoon soy sauce1/4 teaspoon sugar1/2 teaspoon salt1 teaspoon sesame oilFreshly ground black pepper

Directions:

1. For the filling, combine the ingredients under FOR THE GROUND PORK, and let it sit marinating for at least 10 minutes.  While that is marinating, shred the cabbage and carrots, and slice the mushrooms into thin strips.
2. Heat a large pan over high heat, add the cooking oil and coat the pan.  Add the pork and cook until it is no longer pink.  Turn heat down to medium-low, and push the meat to one side of the pan.  Add the garlic, cabbage, ginger,a dn mushrooms and cook for about a minute, until the veggies are softened. Ad the rice wine, soy sauce, sugar, sesame oil and pepper.  Cook another minute, and then scoop out the filling and place it on a cookie sheet to cool.  Make sure to drain any excess liquid off.  Let it cool for at least 15 minutes.
3.When filling each egg roll, make sure to only use one heaping tablespoon of filling, and make sure not to over stuff them.
4.  To fry the egg rolls, fill a wok, pot or deep fryer with about 2 inches of oil.  Heat the oil to 350 degrees,  Gently slide in or lower the egg rolls, frying 4 to 6 at a time, turning occasionally, until golden brown, place on a wire rack to drain or cool.


I used a deep at fryer cause I have one and it is convenient and I don't have to dispose of the oil in the same way as I would with a pan with oil in it.  
The best thing about the website that I used was that it gave a step by step guide...granted I only remembered that after I got about 2/3 of the way through the egg rolls but once I did remember it was very helpful.  These egg rolls were light on flavor and delicious, the wrappers that I found made the wrapping crisp and perfectly matched the filling.  I would definitely recommend making these, just make sure you have plenty of time and maybe even a helper to handle the load, cause it is a lot.


Have fun making these and don't get too down trodden if you can't wrap the rolls perfectly right away, it does take time!


ENJOY!

Monday, February 13, 2012

"Best Ever Macaroni and Cheese"

When you see "Best Ever" in a title how can you not try it, and then try to make it better.  I watch "Diners, Drive-Ins, and Dives" all the time and so I get ideas from the chefs on the show. Many times the chefs on the show have an awesome recipe for mac and cheese, and there is usually one thing in common (other than the obvious pasta and cheese) and that is bacon pieces.  I believe that bacon and Mac and Cheese just belong together and so with this recipe I did add bacon and used bacon grease as a substitute for one tablespoon of butter.


I must warn you, this is a very rich recipe and I would suggest using it as a side dish with the rest of the meal being very lite.  My husband and I made the mistake of eating it as the main dish and let my tell you, I could only eat about half a serving before feeling full, the hubby wasn't so aware of his stomach, just that he liked the food,and he made himself sick by eating too much.


I halved this recipe and it was still enough to feed a family of 4-6 as a side dish.  I would recommend at least halving it if not more, unless you intend to feed many.  I could never fathom a time where I would need to make the whole recipe.


  • 1/2-3/4 cup of panko bread crumbs (they have a great crunch — use any kind of bread crumbs you like)
  • 8 tablespoons (1 stick) unsalted butter, plus more for dish
  • 5 1/2 cups milk (skim works just fine, so save yourself the fat)
  • 1/2 cup all-purpose flour
  • 2 teaspoons kosher salt
  • 1/4 teaspoon freshly grated nutmeg (I used 1/8 tsp)
  • 1/4 teaspoon freshly ground black pepper (I used 1/8 tsp)
  • 1/4 teaspoon cayenne pepper (Leave this out if you don’t want the heat)
  • 4 1/2 cups (about 18 ounces) grated sharp cheddar
  • 2 cups (about 8 ounces) grated Gruyère or Monterey jack 
  • 1 pound radiatore pasta (or whatever kind of pasta you like — the radiatore’s groves really held onto all that cheese sauce)


1. Heat the oven to 375 degrees. Butter a 3-quart casserole dish; set aside.
2. Fill a large saucepan with water. Bring to a boil. Add pasta; cook 2 to 3 fewer minutes than manufacturer’s directions, until outside of pasta is cooked and inside is underdone. (Different brands of macaroni cook at different rates; be sure to read the instructions.) Transfer the pasta to a colander, rinse under cold running water, and drain well.
3. For the panko, melt 2 tablespoons of butter in a pan.  Add 1/2-3/4 cup of panko and toast until coated in butter and golden brown.  Set aside.
4. In a medium saucepan set over medium heat, heat milk. Melt remaining 6 tablespoons butter in a high-sided skillet over medium heat. When butter bubbles, add flour. Cook, stirring, 1 minute.
5. Slowly pour hot milk into flour-butter mixture while whisking. Continue cooking, whisking constantly, until the mixture bubbles and becomes thick.
6. Remove the pan from the heat. Stir in salt, nutmeg, black pepper, cayenne pepper, 3 cups cheddar, and 1 1/2 cups Gruyere or Monterey Jack. Set cheese sauce aside.  (Adjust the seasonings to your liking.  I thought the full amount of nutmeg and black pepper was too strong, so I cut it in half.)
7. Stir macaroni into the reserved cheese sauce.
8. Pour the mixture into the prepared casserole dish. Sprinkle remaining 1 1/2 cups cheddar and 1/2 cup Gruyere or Monterey Jack ; scatter breadcrumbs over the top. Bake until browned on top, about 30 minutes. Transfer dish to a wire rack to cool for 5 minutes; serve.


I added about 6-10 slices of bacon and after frying it up and setting it aside I reserved a tablespoon of the drippings to substitute for the butter.  I added the bacon pieces when I added the cheese and it mixed very well.  I also used a Colby jack cheese because I could not find any Monterey jack cheese in the stores up here (a common occurrence).


Tip: Usually I like a lot of cheese but I could have done without the extra cheese on top, I feel that it over powered the dish and added to richness, which was not needed. I would also recommend using panko breadcrumbs, they add the element of crunch to the dish and makes it so much better.


ENJOY!

Better Than "Olive Garden" Alfredo with chicken

 I am going to do two posts today because I do want to make up for the lack of posts this past week, what can I say work caught up with me.  Although I did make everything I had listed I did not find time between making it and my husband playing computers games to post about them so here they are.


I must start this post off by letting you know I did have a guest cook in the kitchen with me while I was cooking, his name is Max, he is 5 years old, and he loves to be in the kitchen while I cook, sitting on the chair that he nudges close so he can get a good look.  Max is one of my cats  :)


I am a sucker for some good alfredo, but I have been deeply disappointed by countless restaurants due to their sauce not being creamy enough or lacking flavor (and this does not mean salt). I had been scouring the internet looking for the right recipe, many of them call for ingredients that I can not find in grocery stores up here (we do not have much in the way of ethnic or different foods). Others sounded quite difficult and time consuming, which is fine once in a while but with how much I love alfredo I knew I would be making it often, and time consuming sauce is not something I want to have to make.  Then one day I came across this gem of a recipe, its called “Better than Olive Garden Alfredo Sauce,” and trust me when I say, it sooooooooo is. Its creamy, its rich, its tasty, and it is super easy to make!

Ingredients:
3 Tablespoons Sweet Butter
2 Tablespoons Olive Oil
2 Garlic Cloves
2 Cups Heavy Cream
¼ Teaspoon white pepper
½ Cup Grated Parmesan Cheese
¾ Cup Mozzarella Cheese
1 (12 oz) Box  Angel Hair Pasta

Directions:
  1. Melt the butter in a medium saucepan with the olive oil over medium heat.
  2. Add the garlic, cream, white pepper and bring to a simmer.
  3. Stir often.
  4. Add the parmesan cheese and simmer the sauce for 8-10 minutes or until the sauce has thickened and is smooth.
  5. When the sauce has thickened add the mozzarella cheese and stir until smooth. Stir frequently.
  6. While the Sauce cooks, boil noodles for 3-5 minutes.
  7. Place pasta on serving plate and spoon sauce over pasta.
This recipe is honestly better than any alfredo sauce I have ever had.  I always serve it with some chicken that I slice into thin strips and cook in some olive oil, rosemary, oregano, and thyme.  An easy dinner that is sure to please all!

Sunday, February 5, 2012

This Week in Meals

Here are this upcoming week's meals:

Better Than Olive Garden Alfredo with Chicken
Homemade Bacon Mac and Cheese
Oven Baked Tilapia

Come back to see how these things turn out and get the recipes!

Pastitsio

Pastitsio has been a favorite of my family's for years, and when my husband and I were dating I made it for him, and he fell in love too.  It is a Greek dish that is time consuming to make, but it is well worth the work!  When I describe this dish to those who have never heard of it is simple it is similar to a lasagna type casserole it has all the ingredients, pasta tomato sauce cheese, only this has more seasoning and make great left overs!

Ingredients:


For the Filling:
3/4 lb ground beef or turkey
1/2 c. chopped onion
1 garlic clove
1 can (8 oz) tomato sauce
1/2 t. salt
1/2 c. grated parmesan cheese
1/2 t. nutmeg
pepper to taste
3/4 c. elbow macaroni, uncooked
3 tablespoons butter
1/4 c. bread crumbs


Cream Sauce:


3 tablespoons of butter
1/4 teaspoon salt
2 egg yolks
1/4 c. flour
1 1/2 c. milk
1/4 c. parmesan cheese


Directions:


For the filling:  
     In medium skillet, cook ground meat, onion and garlic until meat is cooked through and onion is tender.  Spoon off drippings. Add tomato sauce, salt, nutmeg, and pepper.  Simmer uncovered, until most of the liquid is absorbed, about 5 minutes; set aside.
      Meanwhile, cook macaroni according to package directions, omitting salt.  Drain well and toss hot macaroni with 1 tablespoon butter.  Set aside.
     Preheat oven to 350 degrees.  place remaining 2 tablespoons in a shallow 1 1/2 quart baking dish and place in oven just long enough for the butter to melt, about 3 minutes.  Sprinkle on bread crumbs and 1/4 cup parmesan cheese.  Spread half the macaroni over the breadcrumbs.  Spoon on meat mixture.  Top with remaining macaroni and then sprinkle with remaining 1/4 cup of parmesan.
For the sauce:
     In a medium sauce pan melt the butter over low heat, stir in flour and salt until smooth.  Gradually stir in milk and cook over medium heat, stirring constantly, until thick and smooth.  Gradually stir about 1/3 of sauce into egg yolks, then pour egg mixture all at once into hot sauce, stirring constantly to avoid lumping.  Cook about 1 minute until thickened.  Remove from heat, stir in parmesan cheese.  Pour sauce over macaroni; smooth with back spoon.  Bake 25-30 minutes until hot and bubbly.

     Now the nutmeg might turn off a few of you, but please give it a try, it bring out a nice savory taste that only the mixture of meat, tomato sauce and nutmeg can give, there really is no explaining it until you try it, and I promise if you try it, you will want to make it over and over again.

TIP: to get a thick cream sauce you need to be patient, unless you are 100% sure that the sauce can not get any thicker, give it a little more time.   If you rush the sauce the dish will not turn out correctly and you will not get the full effect.

     I love garlic so I do add about 2 more cloves than what is called for, and we have found that both ground beef and ground turkey work well, with the turkey one being a little more healthy. I also like to put the onions and garlic and onion in before the beef and let them cook down, not stirring them, so they get a little browned, this brings out the flavor more and then you don't feel like you are eating a lot of onions, the get very soft and almost melt in your mouth.

 Enjoy!


Thursday, February 2, 2012

Strawberry Banana Breakfast Smoothie

     As you all will eventually find out, if you don't already know, I am a pretty lazy person and I try to find the easiest way possible for anything and everything I do.  Now I admit that it does not always pan out for me (I think my father just died from shock that I admitted that) and the following is one time where it bit me in the butt.
     As I have said before I work 2 jobs, so I am ALWAYS tired, I try to sleep as late as possible and to do so I like my breakfast in smoothie form, I just throw things in my awesome blender, blend for 1 minute, toss it into a cup and go to work.   So I spent some time looking at smoothie recipes online and there was not one in particular that I just had to try, so I decided to combine a couple and see how it turns out.
     Many of the recipes I found called for cooked oatmeal, which takes time and planning, both of which I don't have/not really capable of, but I did find one recipe that used old fashioned uncooked oats.  Oh an easier option...Done.

So in my recipe I used:
     Frozen Strawberries and bananas (i bought a bag at my local grocery store)
     1 Fresh Banana
     1/4 cup of greek vanilla yogurt
     1/4 cup of old fashioned oats
     1/2 cup of milk and some more if needed
     Honey (for taste)
     Ice

     Honestly, the shake was pretty good a little on the thick side, but the tasted great.  My only qualm with the smoothie was the oats, they scratched my throat and made the consistency not so appealing, and I am huge on texture/consistency.  After drinking about 10-15 ounces of the smoothie I finally admitted to myself that waking up an extra 20 minutes early to cook the oats, will make this smoothie ahhmazing.  The honey adds sweetness that is perfect with the banana.  I will be making this again, and I will not cut corners.  you can bet on me getting up early to cook and cool the oatmeal, and thanks to a co-worker of mine who told me to put the cooked oatmeal in the freezer while I take a shower and it will be cool enough to use and not melt the frozen fruit.